

Audio
Add, process, and generate audio.
Sound comes from video clips, from audio files, from Freesound, from an AI voice, from AI music and sound effects, or from the user's microphone. The editor improves it with presets, audio effects, and an equalizer.
Setup
Upload, microphone recording, presets, audio effects, the equalizer, and volume work with no setup. Stock music and text to speech need a key or an AI provider:
import { VideoEditor } from '@layermetry/media-editor/react';

export default function App() {
  return (
    <div style={{ position: 'fixed', inset: 0 }}>
      <VideoEditor
        licenseKey="YOUR_LICENSE_KEY"
        onClose={() => console.log('The editor was closed')}
        onExport={(file) => console.log(`Exported ${file.name}`)}
        // Stock music: your Freesound key.
        stockMediaApis={{ music: { apiKey: 'YOUR_FREESOUND_KEY' } }}
        // Text to speech: your AI proxy.
        ai={{ endpointUrl: 'https://api.example.com/ai' }}
      />
    </div>
  );
}| Option | Prop | Configuration page |
|---|---|---|
| Stock music | stockMediaApis.music | Stock media |
| Text to speech | ai | AI providers |
| Music and sound effects | ai with your own server | Custom AI endpoint |
Upload
Open Media, choose Audio, and press Upload Audio. Press + on the file under Local Upload to add it to the timeline. The panel lists MP3, WAV, and M4A.
A sound file has no picture, so it appears only in the timeline.
Stock music
With stockMediaApis.music, the Audio tab of Media shows Stock Music. The user searches, listens to a preview, and adds a track.
Audio presets
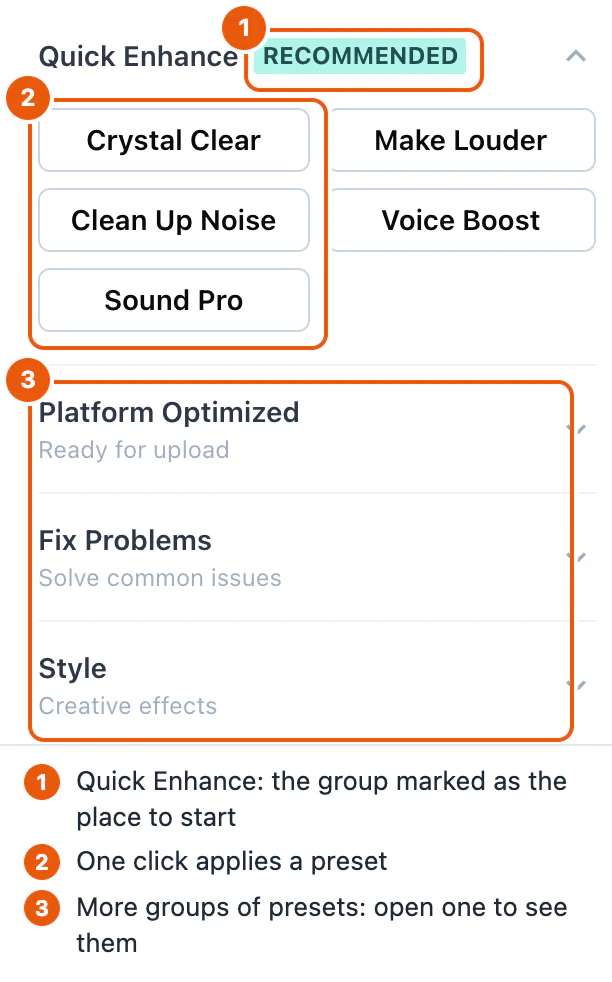
A preset applies a ready-made set of audio effects in one click. Select a clip with sound, open Audio Effects in the tool rail, and choose a preset on the Presets tab. The same presets appear in a row under the canvas.
| Group | Presets |
|---|---|
| Quick Enhance | Crystal Clear, Make Louder, Clean Up Noise, Voice Boost, Sound Pro |
| Platform Optimized | YouTube (−14 LUFS), TikTok, Podcast, Voiceover, Interview, Vlog, Music Video, Presentation |
| Style | Warm & Rich, Bass Boost, Bright & Airy, Radio Ready, Lo-Fi Vinyl, Wide Stereo, Punchy Drums, Cinematic |
| Fix Problems | Fix Muffled, Fix Quiet, Fix Echo, Fix Tinny, Fix Phone, Fix Video Call, Fix Wind, Fix Hum, Fix Pops |
The editor listens to the clip and marks the presets that suit it with a star.
Presets and effects apply to the preview and to the exported video.
Audio processing
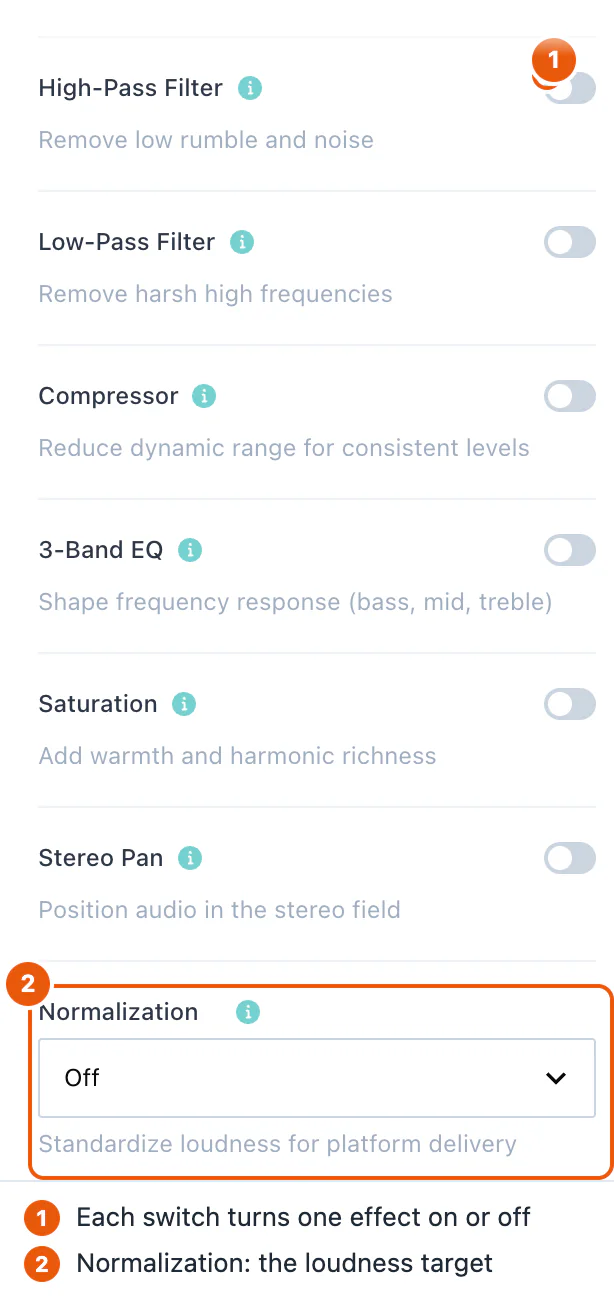
The Advanced tab of Audio Effects has one switch for each effect:
| Effect | What it does |
|---|---|
| Volume | Changes the level of the clip. |
| High-Pass Filter | Removes low rumble and noise. |
| Low-Pass Filter | Removes harsh high frequencies. |
| Compressor | Makes quiet and loud parts more even. |
| 3-Band EQ | Changes bass, mid, and treble. |
| Saturation | Adds warmth. |
| Stereo Pan | Moves the sound to the left or the right. |
| Normalization | Sets the loudness: Off, Peak (0 dBFS), LUFS −14 (Spotify and YouTube), LUFS −16 (podcasts), or LUFS −11 (broadcast). |
Equalizer
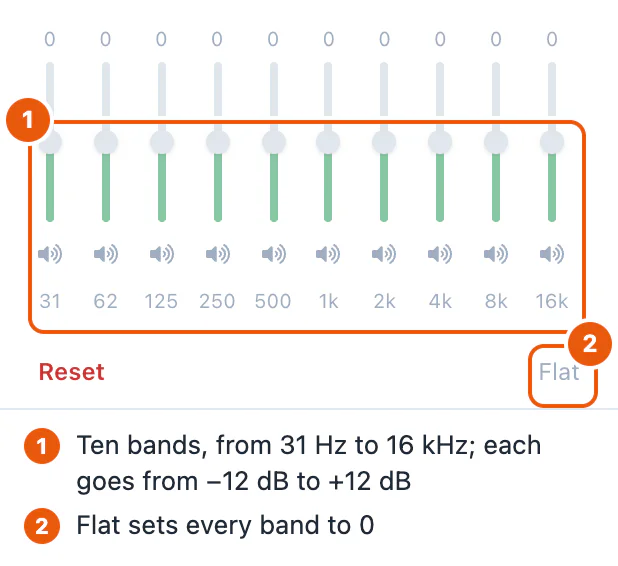
The Graphic EQ tab has ten bands, at 31, 62, 125, 250, and 500 Hz, and at 1, 2, 4, 8, and 16 kHz. Each band goes from −12 dB to +12 dB. Flat sets all bands to 0.
Volume and mute
To change the level of one clip, turn on Volume on the Advanced tab. To silence one clip, press the speaker icon on the clip in the timeline.
The mute button and the volume slider above the timeline, from 0 to 200%, change the preview only. The exported video keeps the levels of the clips.
Text to speech
ai. See AI providers.Open Media, choose Audio, and press Generate voiceover. The user types the words and presses Generate. Add to timeline adds the chosen recording to the timeline.
The request has "operation": "voice", and your server answers with { items: [{ url, durationSeconds }] }. The duration is optional. ai.voice.voices limits the voices users can choose. See Custom AI endpoint.
AI music generation
ai={{ endpointUrl }} or ai={{ requestFn }}. There is no hosted service for music and sound effects. See Custom AI endpoint.The editor makes music and sound effects from a description. Open Media, choose Audio, and press Generate music or Generate sound effect. Both buttons are under Generate voiceover. Cmd+K on a Mac, or Ctrl+K, with nothing selected, lists both too. The user describes the sound, for example "calm piano for a product story" or "a wooden door closing softly", and presses Generate.
The two buttons appear only when your server's model list names a model for them. A server that makes no music shows neither button. See Model list for music.
Length
| Choices | Starts on | |
|---|---|---|
| Music | 15 s, 30 s, 60 s, Match the video, or a number of seconds | Match the video when the timeline has something on it, otherwise 30 s |
| Sound effect | Auto, 1 s, 3 s, 5 s, or a number of seconds | Auto: the model decides |
Match the video asks for the length of the timeline, to a tenth of a second. The length is kept inside the model's range. The range is shown under the row, for example "This model makes music from 3 seconds to 3 minutes long." A length outside the range is refused with the same sentence, and nothing is sent.
When the range comes from your ai setting and not from a model list, the sentence starts with "This editor" instead, for example "This editor makes music up to 5 minutes long."
Instrumental and Loops cleanly
Music has an Instrumental switch. It is on at first, so music under a voiceover has no singing. A sound effect has a Loops cleanly switch. It is off at first. Turn it on for a sound whose end joins its start, such as rain.
Placing the sound
Each result plays in the box, with its length. Add to timeline adds the selected sound as a clip with its real length. Music made with Match the video starts at 0 seconds, so it covers the video. Every other sound starts at the playhead. Then the user moves, trims, and sets the volume of the sound like any sound clip.
The real length is the length your server states. When your server does not state it, the editor reads it from the file. A sound whose length cannot be read is not added, and the user sees "The length of this sound could not be read, so it was not placed."
Music gives one result, and Try again asks for another. A sound effect can give up to four results, and the user chooses one.
The box says Uses AI credits. When you set a limit with maxPerSession, it also says how many requests are left, for example Uses AI credits · 2 left. It shows no price.
Generated sound passes through onUploadAsset with source: 'generated'; the design keeps the reference your host returns. See Asset storage.
Microphone recording
The user records a voiceover with the microphone, inside the editor, while the video plays. Open Media, choose Audio, and press Record voiceover. On a desktop, the recorder takes the place of the Media panel. On a phone, it opens below the canvas.
The browser asks for permission to use the microphone. Recording needs a secure page: HTTPS, or localhost. The recorder never plays the microphone through the speakers.
The recorder has these settings. The browser remembers each choice.
| Setting | Default | What it does |
|---|---|---|
| Microphone | the system microphone | Chooses the input. Shown only when the device has more than one. |
| Play the video while recording | on | The video plays from the playhead while the user speaks. |
| Hear the video's sound | off | Plays the video's sound during the recording. The recorder says: "Use headphones, or the microphone will record it too." While it is off, the recorder shows Video sound off. |
A level meter shows the microphone's level before and during the recording. When the sound is close to the maximum, the top bars turn red, and the recorder shows Too loud.
Press Record, or Enter. After the countdown, the recorder records and shows the time. Press Stop, Enter, or the Space bar to stop. When the video played along, the playhead goes back to where the recording started. Escape cancels a countdown or a recording.
The recording, a take, appears in the recorder. The user plays it, then presses Use this to add it to the timeline, Record again to record another take, or the discard button to delete it. Use this adds the take at the moment on the timeline where its recording started, and selects it. One undo removes it.
A take shorter than half a second is not kept. The recorder then says: "The recording was too short to keep. Try again."
The file is WebM with Opus sound in Chrome, Edge, and Firefox, and MP4 (.m4a) in Safari. It is named voiceover-1, voiceover-2, and so on, with the extension of its format, for example voiceover-1.webm. The editor does not convert it.
With onUploadAsset, Use this first passes the file to your function with source: 'recorded', and the timeline keeps your reference. See Recorded voiceovers. Without it, the take stays in the browser, like a sound file from the user's computer. See Temporary assets.
When the recorder cannot start, it says why, and Record is turned off:
| Situation | What the recorder says |
|---|---|
| The user or the browser refused the microphone | The browser did not allow this page to use the microphone. Allow it in the address bar, then try again. |
| No microphone | No microphone was found on this device. |
The page is not HTTPS or localhost | Recording needs a secure page (https or localhost). |
| Anything else | The microphone could not be started. Close other apps that use it, then try again. |
Countdown
Before the recording starts, the recorder counts down. The user chooses the length under Countdown: Off, 3 s, or 5 s. The default is 3 seconds.
To set your own default, pass recording.countdownSeconds: 0, 3, or 5. The user's own choice in that browser still wins. To remove the choice, set ui.features['recording.countdownChoice'] to false. The recorder then always uses your default, or 3 seconds.
<VideoEditor
  licenseKey="YOUR_LICENSE_KEY"
  onClose={() => console.log('The editor was closed')}
  recording={{ countdownSeconds: 5 }}
  ui={{ features: { 'recording.countdownChoice': false } }}
/>
Input level
By default, the browser keeps the user's voice at an even level. To set the level by hand, the user turns off Automatic level. A Level slider then appears under the level meter, from 10% to 200%. The meter shows the level after the slider, and the recording has the same level.
To remove both settings, set ui.features['recording.inputLevel'] to false. The browser's automatic level is then always used.
Clean up noise
Each take has a Clean up noise box. When it is ticked, Use this adds the take with the Clean Up Noise preset already on it. It is the same preset as in Audio presets, so the preview and the exported video both have it. It runs in the browser, and it uses no AI and no credits. One undo removes the take and the preset together.
To tick the box by default, pass recording.cleanUpNoise: true. The user's own choice in that browser still wins. To remove the box, set ui.features['recording.cleanUp'] to false. The take then gets the preset only when recording.cleanUpNoise is true.
Several takes
Record again keeps the take and records another one. The newest take is shown at the top. The earlier takes are listed under Earlier takes, newest first, as Take 2, Take 1, and so on. Each has a play button, Use, and a delete button. Use adds that take at the moment on the timeline where its own recording started.
The takes exist only while the recorder is open. When the user closes the recorder with takes that were not used, the recorder asks first, for example: "Close the recorder? 2 recordings you have not used will be lost."
The recorder keeps at most 10 takes. At 10, Record again is turned off, and the recorder says: "You have kept 10 takes, the most the recorder holds. Delete one to record again."
To keep one take at a time, set ui.features['recording.takes'] to false. Record again then replaces the take. For a take longer than 30 seconds, the recorder first asks, for example: "Discard this 1:20 recording?"
To receive every take in your storage, not only the one the user adds, see Recorded voiceovers.
Script and prompter
The recorder has a Script section for the words the user reads. While the user records, a prompter strip shows the words and moves on by itself.
The script comes from one of three places:
- Type or paste: the user types or pastes the words. The prompter moves at the Speed that the user sets, from 80 to 220 words a minute. The default is 140. The browser remembers the speed.
- From captions: the user picks a caption track of the design. The prompter follows the times of the captions at the playhead, so each line appears when the captions show it.
- Your code: pass the words as
recording.script, or run thevoiceoverSetScriptaction. The words appear in the Type or paste box, where the user can still change them.
<VideoEditor
  licenseKey="YOUR_LICENSE_KEY"
  onClose={() => console.log('The editor was closed')}
  recording={{ script: 'Welcome to our spring sale. Everything is 20% off.' }}
/>
A new value of recording.script replaces the current script. Leaving the prop out changes nothing. A script has at most 20,000 characters. A longer value is ignored, with a warning in the console.
When the design is saved, the script is saved with it as voiceoverScript. See Saving and loading. To remove the Script section and the prompter, set ui.features['recording.script'] to false.
ai. See AI providers.The Type or paste box has Write with AI. The user answers "What is the video about?", then presses the button. The words come back into the box, and the user can change them. Under the button, the recorder says Uses AI credits, and how many requests are left when you set a limit. Nothing is sent until the user presses the button.
The request is the same text request as the Text panel's: { "operation": "text", "prompt": "…" }. Your server answers with text. See Custom AI endpoint.
Captions from a recording
Each take has Generate captions. It writes down what was said, then adds the take and a caption track under it, timed to the voice. The caption track starts where the take starts. Under the button, the recorder says "Adds this take with a caption track of its words. Uses AI credits.", with the requests left when you set a limit. Nothing is sent until the user presses the button.
When the transcription fails, the take is not added, and the recorder says: "The captions could not be written:", then the reason, then "The take was not added; try again, or press Use this." When no speech is heard, the recorder says: "No speech was heard in this take, so there are no captions to add."
The recorder sends the first language of ai.captions.languages. Without a list, it sends no language, and the transcription service detects it. To remove the button, set ui.features['recording.captions'] to false. ui.generative hides it wherever it hides captions.
Re-record part of a clip
To fix a part of a voiceover without recording all of it again, select the sound clip on the timeline and open the recorder. Turn on Replace part of the selected clip, then set From and To. Type a time to a tenth of a second, or press Playhead to use the position of the playhead.
Press Record. There is no countdown. The video plays for 2 seconds before From, so the user hears what comes before. It never starts before 0:00. The recording starts at From and stops by itself at To. The take shows the range, for example "Replaces 0:05.0 to 0:07.5 of the clip".
Use this cuts the clip at From and at To, removes the part between them, and places the new take there. The new take fills the range exactly, with no gap and no overlap. One undo brings back the whole clip.
A range must be inside the selected clip and at least half a second long. Otherwise the recorder says why, for example "The range must be inside the selected clip, from 0:02.0 to 0:12.0." or "The range must be at least half a second long.", and Record is turned off.
On a phone, a selected clip replaces the bottom bar with its own buttons. There, select the sound clip and press Re-record part. The recorder opens with Replace part of the selected clip already on.
To change the time that plays before the range, pass recording.preRollSeconds, from 0 to 10. To remove the option, set ui.features['recording.punchIn'] to false.
Audio fades
Audio fades raise the sound of a clip from silence at its start, and lower it to silence at its end, in straight lines. They work on sound clips and on video clips with sound. The picture is not faded.
Select the clip and open ⋯ in the bar under it, then choose Fades. For a sound clip, the Fades (s) group is in the toolbar above the canvas. Each has two fields in seconds: In for the fade-in and Out for the fade-out. A value is kept between 0 and the length of the clip, and never more than 60 seconds. 0 removes the fade. Each change is one step to undo.
The preview and the exported video fade the sound at the same moments. When a clip is split, the fade-in stays with the first piece and the fade-out with the second. From your own code, use the audioSetFades action with fadeInSeconds and fadeOutSeconds. The document stores them as fadeIn and fadeOut on the clip.
Sound effects library
Coming soonThe sound effects library will offer short sounds, such as clicks and whooshes, to add to the timeline.
Configuration
| Prop | Type | Default | Description |
|---|---|---|---|
stockMediaApis | object | none | music connects Freesound. Without it, there is no Stock Music tab. |
ai | object | none | The AI provider for text to speech, music, and sound effects. voice: false hides Generate voiceover. music: false and soundEffect: false hide the other two. music and soundEffect take minDurationSeconds and maxDurationSeconds. |
ui.features['aiSound.length'] | boolean | true | false hides the Length row. Music then asks for the length of the video, or 30 seconds on an empty timeline. A sound effect lets the model decide. |
ui.features['aiSound.instrumental'] | boolean | true | false hides the Instrumental switch. Music is then always made without singing. |
onUploadAsset | function | none | Stores sound files, including generated sounds; a recorded voiceover is sent when the user presses Use this. |
recording | RecordingConfig | none | Settings for the voiceover recorder. See the table below. |
ui.features | object | every recorder control on | 'recording.microphone': false removes Record voiceover. The other recording. switches remove one control each. See UI customization. |
The fields of recording are all optional:
| Field | Type | Default | Description |
|---|---|---|---|
countdownSeconds | 0, 3, or 5 | 3 | The countdown before recording starts. 0 is no countdown. |
cleanUpNoise | boolean | false | Ticks Clean up noise by default. |
uploadAllTakes | boolean | false | Sends every take to onUploadAsset, not only the take the user adds. |
script | string | none | The words for the prompter, at most 20,000 characters. |
preRollSeconds | number | 2 | How long the video plays before the range when the user re-records part of a clip. From 0 to 10. |
The user's own choices in the recorder win over these defaults, except where a ui.features switch hides the choice. A value that is not allowed is ignored, and the console shows one warning, for example "[MediaEditor] recording.countdownSeconds was ignored: expected 0, 3, 5 or nothing, got 4.". The type is RecordingConfig.
Events
Audio has no events of its own. The sound reaches you inside the exported video through onExport. See Events.